The key parts of a scientific poster
A poster presentation provides the opportunity to show off your research to a broad audience and connect with other researchers in your field.
For junior researchers, presenting a poster is often the first type of scientific presentation they give in their careers.
The discussions you have with other researchers during your poster presentation may inspire new research ideas, or even lead to new collaborations.
Consequently, a poster presentation can be just as professionally enriching as giving an oral presentation, if you prepare for it properly.
In this guide post, you will learn:
- The goal of a scientific poster presentation
- The 6 key elements of a scientific poster
- How to make a scientific poster
- How to prepare for a scientific poster presentation
- ‘What to do on the day of the poster session.
Our advice comes from our previous experiences as scientists presenting posters at conferences.
Why make a scientific poster?
Posters can be a powerful way for showcasing your data in scientific meetings. You can get helpful feedback from other researchers as well as expand your professional network and attract fruitful interactions with peers.
Scientific poster sessions tend to be more relaxed than oral presentation sessions, as they provide the opportunity to meet with peers in a less formal setting and to have energizing conversations about your research with a wide cross-section of researchers.
Type of poster formats
- Physical posters: A poster that is located in an exhibit hall and pinned to a poster board. Physical posters are beneficial since they may be visually available for the duration of a meeting, unlike oral presentations.
- E-posters: A poster that is shown on a screen rather than printed and pinned on a poster board. E-posters can have static or dynamic content. Static e-posters are slideshow presentations consisting of one or more slides, whereas dynamic e-posters include videos or animations.
Some events allow for a combination of both formats.
Sections of a scientific poster
The sections included in a scientific poster tend to follow the format of a scientific paper, although other designs are possible. For example, the concept of a #betterposter was invented by PhD student Mike Morrison to address the issue of poorly designed scientific posters. It puts the take-home message at the center of the poster and includes a QR code on the poster to learn about further details of the project.
| Poster section | Description |
|---|---|
Heading | The title of your research project, and one of the most important features of your poster. Use a specific and informative headline to attract interest from passers-by. Logos for funding agencies and institutions hosting the research project are often placed on either side of the heading. |
Subheading | List of contributing authors, affiliations, and contact details of corresponding author (usually the person presenting the poster). List the authors in the same order as on the publication. |
Introduction | Includes only essential background information as well as the goals of the study. Keep it brief, and use bullet points. The introduction should also highlight the novelty of your research. |
Methods | A chronological order of the steps and techniques used in your project. Include an image or diagram representing your study system if possible. |
Results | Has at most 3 graphs showing the key findings of your study, along with short descriptions. This section should occupy the most space on your poster. |
Conclusion | Summarizes the take-home message of your work. |
References | Includes the key sources used in your study. Have at most 6 references listed. |
Acknowledgments | List funding sources, and contributions from anyone who helped with the research. |
Before you start: tips for making a scientific poster
- Anticipate who your audience during the poster session will be—this will depend on the type of meeting. For example, presenting during a poster session at a large conference may attract a broad audience of generalists and specialists at a variety of career stages. You would like for your poster to appeal to all of these groups. You can achieve this by making the main message accessible through eye-catching figures, concise text, and an interesting title.
- Your goal in a poster session is to get your research noticed and to have interesting conversations with attendees. Your poster is a visual aid for the talks you will give, so having a well-organized, clear, and informative poster will help achieve your aim.
- Plan the narrative of your poster. Start by deciding the key take-home message of your presentation, and create a storyboard prioritizing the key findings that indicate the main message. Your storyboard can be a simple sketch of the poster layout, or you can use digital tools to make it. Present your results in a logical order, with the most important result in the center of the poster.
- Give yourself enough time to create a draft of your poster, and to get feedback on it. Since waiting to receive feedback, revising your poster, and sending the final version to the printers may take a few days, it is sensible to give yourself at least 1-2 weeks to make your poster.
- Check if the meeting has specific poster formatting requirements, and if your institution has a poster template with logos and color schemes that you can use. Poster templates can also be found online and can be adapted for use.
- Know where you will get your poster printed, and how long it typically takes to receive the printed poster.
- Ensure you write a specific and informative poster abstract, because specialists in your field may decide to visit your poster based on its quality. This is especially true in large meetings where viewers will choose what posters to visit before the poster session begins because it isn’t possible to read every poster.
The 6 technical elements of a scientific poster
The technical elements of a scientific poster are:
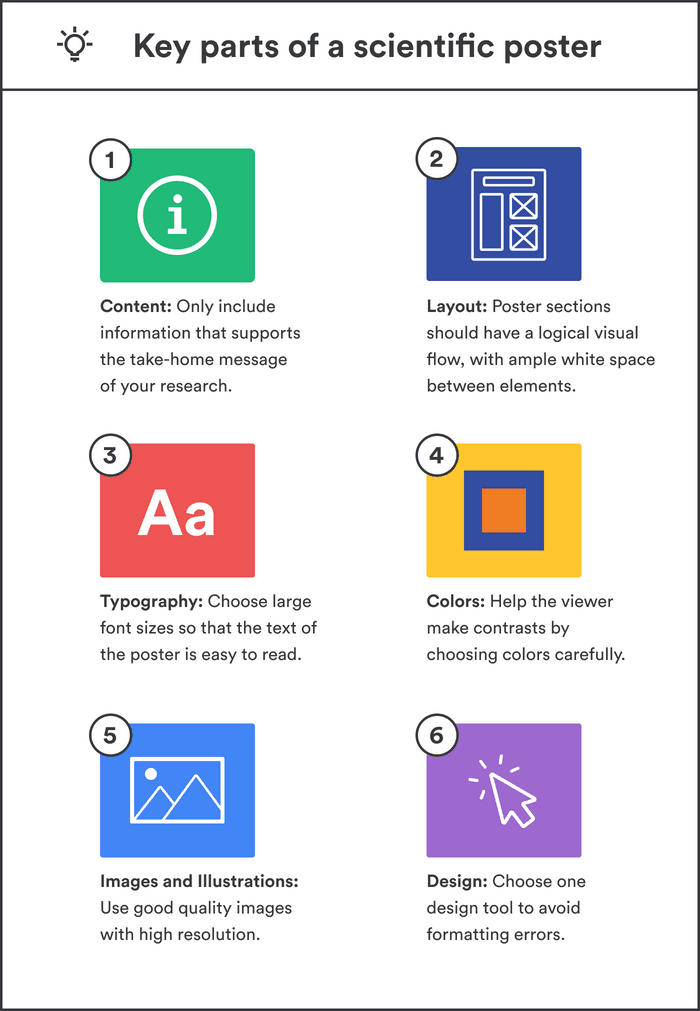
1. Content
Don’t be tempted to cram your entire paper into your poster—details that you omit can be brought up during conversations with viewers. Only include information that is useful for supporting your take-home message. Place your core message in the center of your poster, using either text or visual elements. Avoid jargon, and use concise text elements (no more than 10 lines and 50 words long). Present your data in graphs rather than in tabular form, as it can be difficult for visitors to extract the most important information from tables. Use bullet points and numbered lists to make text content easy to read. Your poster shouldn’t have more than 800 words.
2. Layout
Poster sections should have a logical visual flow, ideally in a longitudinal fashion. For example, in an article on poster presentations published in Nature, scientific illustrator Jamie Simon recommends using the law of thirds to display your research—a 3-column layout with 3 blocks per column. Headings, columns, graphs, and diagrams should be aligned and distributed with enough spacing and balance. The text should be left-aligned while maintaining an appropriate amount of "white space' i.e., areas devoid of any design elements.
3. Typography
To ensure the title is visible from 5 meters away, use a sans serif 85pt font. The body text should use a minimum of 24pt serif font so that it can be read from a one-meter distance. Section headings and subheadings should be in bold. Avoid underlining text and using all capitals in words; instead, a mixture of boldface and italics should be used for emphasis. Use adequate line spacing and one-inch margins to give a clean, uncluttered look.
4. Colors
Appropriate use of color can help readers make comparisons and contrasts in your figures. Account for the needs of color-blind viewers by not using red and green together, and using symbols and dashed lines in your figures. Use a white background for your poster, and black text.
5. Images and Illustrations
Include no more than 4 figures, with a prominent centerpiece figure in the middle of the poster of your study system or main finding. Dimensions for illustrations, diagrams, and figures should be consistent. When inserting charts, avoid gray backgrounds and grid lines to prevent ink consumption and an unaesthetic look. Graphics used must have proper labels, legible axes, and be adequately sized. Images with a 200 dpi or higher resolution are preferred. If you obtain an image from the internet, make sure it has a high enough resolution and is available in the public domain.
6. Design
Tools for poster design include Microsoft PowerPoint, Microsoft Publisher, Adobe Illustrator, In Design, Scribus, Canva, Impress, Google Slides, and LaTeX. When starting with the design, the page size should be identical to the final print size. Stick to one design tool to avoid formatting errors.
How to seek feedback on your poster
Have at least one proofreading and feedback round before you print your final poster by following these steps:
- Share your poster draft with your advisor, peers, and ideally, at least one person outside of your field to get feedback.
- Allow time to revise your poster and implement the comments you’ve received.
- Before printing, proofread your final draft. You can use a spelling and grammar-checking tool, or print out a small version of the poster to help locate typos and redundant text.
How to present your poster
Before giving a poster presentation, you need to be ready to discuss your research.
- For large meetings where viewers of your poster have a range of specialties, prepare 2-3 levels for your speech, starting with a one-minute talk consisting of key background information and take-home messages. Prepare separate short talks for casual viewers with varying levels of interest in your topic, ranging from "very little" to "some".
- Prepare a 3-5 minute presentation explaining the methods and results for those in your audience with an advanced background.
- Anticipate possible questions that could arise during your presentation and prepare answers for them.
- Practice your speech. You can ask friends, family, or fellow lab members to listen to your practice sessions and provide feedback.
Tips for the day of your poster presentation
Here we provide a checklist for your presentation day:
- Arrive early—often exhibition halls are large and it can take some time to find the allocated spot for your poster. Bring tape and extra pins to put up your poster properly.
- Wear professional attire and comfortable shoes.
- Be enthusiastic. Start the conversation by introducing yourself and requesting the attendee’s name and field of interest, and offering to explain your poster briefly. Maintain eye contact with attendees visiting your poster while pointing to relevant figures and charts.
- Ask visitors what they know about your topic so that you can tailor your presentation accordingly.
- Some attendees prefer to read through your poster first and then ask you questions. You can still offer to give a brief explanation of your poster and then follow up by answering their questions.
- When you meet with visitors to your poster, you are having a conversation, so you can also ask them questions. If you are not sure they understand what you are saying, ask if your explanation makes sense to them, and clarify points where needed.
- Be professional. Stand at your poster for the duration of the session, and prioritize being available to meet with visitors to your poster over socializing with friends or lab mates. Pay due attention to all visitors at once by acknowledging visitors waiting to speak with you.
In conclusion
A scientific poster is an excellent method to present your work and network with peers. Preparation is essential before your poster session, which includes planning your layout, drafting your poster, practicing your speech, and preparing answers to anticipated questions. The effort invested in preparing your poster will be returned by stimulating conversations during the poster session and greater awareness of your work in your scientific community.
Other sources to help you with your scientific poster presentation
Frequently Asked Questions about scientific posters
✉️ What is the main goal of a scientific poster?
A scientific poster can be used to network with colleagues, get feedback on your research and get recognition as a researcher.
📎 What should a science poster include?
A scientific poster should include a main heading, introduction, methods, results, conclusion, and references.
📝 What is an e-poster?
An e-poster is a poster fashioned as a slideshow presentation that plays on a digital screen, with each slide carrying a sliver of information.
⏳ Can I design my own poster?
A handful of tools can be used to design a poster including Microsoft PowerPoint, Microsoft Publisher, Illustrator, In Design, Photoshop, Impress, and LaTeX.
📌 How should I present my poster?
Start the conversation by introducing yourself and requesting the attendees' names, affiliations, and fields of interest, and offering to explain your poster briefly. Alternatively, you can give attendees ample time to read through your poster first and then offer to explain your poster in 10 seconds followed by questions and answers.